

The Australians of the Commonwealth Division in the Winter War of 1939-1940 were an eclectic bunch of personalities. Here’s an overview of the key Australian (and one or two New Zealander) officers of the Commonwealth Division which fought with such distinction in the Winter War. As with the men of every country who volunteered for Finland, these were men who were prepared to travel half way around the world to fight for a cause and a country not their own. Courageous and adventurous as the men they led, these officers almost all possessed combat experience from World War one and had remained in the Army through the tough times of the 1930’s. They were elite soldiers, the men they led among the best infantry in the world……..and in Finland they would be put to the test, passing with colours flying.
The Commanding Officers of the Australian Volunteer Units
Having received notification from various quarters that a number of British Commonwealth units would be arriving in Finland, Paamaja (the General Headquarters) decided that these should be grouped together for ease of administration and command. As the dispatch of these units was at this time largely being coordinated through the Australian High Commission in London, Paamajat (the Finnish General Headquarters) requested that the Commonwealth countries contributing also provide the senior commanders for the Division and the Brigade sized forces that would make up the Division. In a further flurry of telegrams and urgent telephone calls, the Canadians advised that while they could put together the command structure for a Brigade, the small size of the Canadian military precluded any Divisional-level commanding officers being made available. New Zealand and South Africa were in a similar situation. For historical reasons going back to World War One, the Australians and New Zealanders rejected a Divisional Commander from the British Army and instead, mutually agreed on an Australian for the position, to which the Canadians agreed. Lieutenant-General Vernon Ashton Hobart Sturdee was selected and hastily dispatched by air on the lengthy journey from Australia to Finland, together with an equally hastily selected Divisional staff slung together piecemeal from Australian, New Zealand, South African, Rhodesian and Canadian officers. Fortunately, the arrangements worked in action and the Commonwealth Division was in action as a coherent, if inexperienced, unit by mid-June 1940 – in time to be on the receiving end of the Red Army’s summer offensive of July and August 1940.
The Australian Army also dispatched support and headquarters personnel for two Brigades, as well as Commanding Officers (the Polish Government-in-Exile agreed that any gaps in the Brigade and Divisional Table of Organization would be filled by miscellaneous Polish units made up from Polish personnel already in Finland – potential language issues were ignored). The 1st (ANZAC) Brigade would be commanded by Australian Brigadier Stanley Savige, the 2nd (Empire) Brigade would be commanded by Australian Brigadier John Joseph Murray while the 3rd (Canadian) Brigade would be commanded by a Canadian officer, Lieutenant-Colonel E.L.M. Burns, who in 1939, had recently attended the Imperial Defence College in London, England. Of the two Australian Volunteer Battalions, one would be commanded by Major Heathcote Howard (“Tack”) Hammer (Hammer was promoted to Lieutenant-Colonel on accepting the command) while the other would be commanded by Acting Lieutenant-Colonel John Gordon Noel Wilton (promotion also confirmed on acceptance of the command). Lieutenant Colonel “Ike” Parkinson of the New Zealand Army would command the Composite ANZAC (Finland Force) Field Regiment for the 1st “ANZAC” Brigade while a South African officer would command the Artillery for the 2nd “Empire” Brigade.
Those selected as commanding officers of the technical arms were all citizen soldiers who had served in WW1 and who had relevant professional qualifications. The senior Engineer Officer was C. S. Steele, a consulting engineer of Melbourne in civilian life, the chief signals officer, J. E. S. Stevens, a senior officer in the Postmaster-General’s Department (which in those days was responsible for radio, telephone and telegram communications). N. B. Loveridge, commanding the Divisional Service Units, was a militiaman who had been a subaltern at Gallipoli in 1915. Colonel (Dr) Lewis Windermere Nott would command Divisional Medical assets while the Rev. Kalervo Kurkiala accepted an appointment as Lieutenant-Colonel in the Australian Army and was appointed Finnish Liaison Officer with the concurrence of the Finnish General Headquarters. Instructions to the Australian COs were that the Australian Volunteer units should be modeled on the Finnish Army organizational structure, and in this Lieutenant-Colonel Kurkiala provided invaluable assistance in laying out and explaining the organization and intent of the Finnish Army Divisional structure, “Regimental Combat Groups”, as well as Battalion and supporting unit organization. On arrival in Finland, it was found that the measures taken to structure units as per Lieutenant-Colonel Kurkiala’s guidance would prove highly beneficial.
For the Australians, this was not that unusual. As we have seen, the Australian Citizen Force (or Militia) units were only for home defence and, as in WW1, new formations and tables of organization were created for the Australian Imperial Force intended for Europe or the Middle East. Thus, falling in with Maavoimat organizational guidelines was not unexpected. With regard to the two Infantry Battalions that the Australian volunteers would form, it was decided to resurrect two WW1 Battalions and it was under the colours of these two Battalions, the F/4th and F/12th Light Horse, famous within Australian for their part in the fighting in the Middle East in WW1, that the Australian Finland Force Infantry would fight.
The 4th and 12th Light Horse were famous for their part in the Battle of Beersheba in 1917 – a battle immortalized in Australian folklore, film and song. The Battle of Beersheba took place on 31 October 1917, as part of the Sinai and Palestine campaign during World War I. Notable was the charge of the Australian 4th Light Horse Brigade, which covered some 6 kilometres (3.7 mi) to overrun and capture the last remaining Ottoman trenches, and secure the surviving wells at Beersheba, a critical water supply point for the advancing British forces. The men of the Australian Finland Force would more than match the achievements of their predecessors in WW1.
Within the Commonwealth Division, the 1st “ANZAC” Brigade would be made up of the early-arriving ANZAC Battalion, the 28th Maori Battalion and the Australian F/4th Light Horse Battalion with the Composite ANZAC (Finland) Field Regiment of artillery and supporting units. The 2nd “EMPIRE” Brigade would be made up of the Australian F/12th Light Horse Battalion, the South African Volunteer Battalion and the Rhodesian Selous Battalion with a South African volunteer-manned Field Artillery Regiment and supporting units. The 3rd “Canadian” Brigade would be made up of two battalions of Canadian Volunteers together with a small group of French and French-speaking Belgian Volunteers who joined a rather larger number of francophone Quebecois volunteers, the Bataillon Charlemagne (originally formed as the Légion des Volontaires Français contre le Bolchévisme), We will look at the Canadian / French / Belgian / Quebecois, South African and Rhodesian Volunteers in later posts.
We will now take a quick look at each of the senior Australian (and some New Zealand) Commanding Officers in turn.
Lieutenant-General Sir Vernon Ashton Hobart Sturdee, Commanding Officer, Commonwealth Division
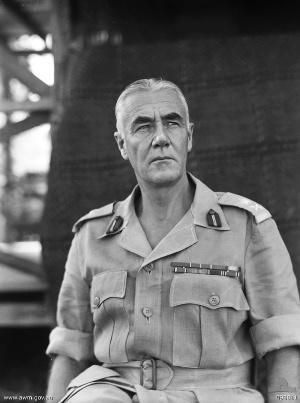
Lieutenant General Sir Vernon Ashton Hobart Sturdee KBE, CB, DSO, Order of the White Rose of Finland, (16 April 1890 – 25 May 1966). Sturdee commanded the Commonwealth Division in Finland through the Winter War, after which he would go on to serve two terms as Chief of the Australian General Staff. In Finland, he proved to be as capable a commander on the offensive as on the defensive.
Born in 1890, Vernon Ashton Hobart Sturdee attended Melbourne Grammer School, joined the Militia and was commissioned as a Second Lieutenant in 1908. He was promoted to Lieutenant in 1911 and married Edith Georgina Robins on 4 February 1913 in Melbourne. Sturdee joined the AIF in August 1914 and was one of the original Anzacs during the First World War, participating in the landing at Gallipoli on 25 April 1915. In the campaign that followed, he commanded the 5th Field Company, before going on to lead the 8th Field Company and then the 4th Pioneer Battalion on the Western Front (at which time he was promoted to Lieutenant Colonel). In 1918 he was seconded to General Headquarters (GHQ) British Expeditionary Force as a staff officer. (His father incidentally was a Doctor and commanded the 2nd Field Ambulance at Gallipoli following which, as a Colonel, was Assistant Director of Medical Services of the 1st Australian Division on the Western Front). He returned to Australia in late 1918 and remained in the Army, with the substantive rank of Captain.
He was promoted to the brevet rank of Lieutenant-Colonel on 1 January 1920, but this would not become substantive until 1 April 1932. In 1921, he attended the Indian Army Staff College at Quetta in India. Posted to the United Kingdom, he served at the War Office and attended the Imperial Defence College in 1931. From 1 January 1931 to 31 December 1932, he was the military representative at the High Commission of Australia in London. From 14 February 1933 to 1 March 1938 he was Director of Military Operations and Intelligence at Army Headquarters in Melbourne, a period in which “the Army was at rock bottom”. He was given the brevet rank of Colonel on 1 July 1935. This became temporary on 1 July 1936 and finally substantive on 1 July 1937, over twenty years after he had become a Lieutenant Colonel in the 1st AIF.
Like his predecessor as Director of Military Operations and Intelligence, Colonel John Lavarack, and many other officers in the Australian Army, Sturdee had little faith in the government’s “Singapore strategy”, which aimed to deter Japanese aggression through the presence of a powerful British fleet based at Singapore. In 1933, Sturdee told senior officers that the Japanese “would all be regulars, fully trained and equipped for the operation, and fanatics who like dying in battle, whilst our troops would consist mainly of civilians hastily thrown together on mobilisation with very little training, short of artillery and possibly of gun ammunition.”
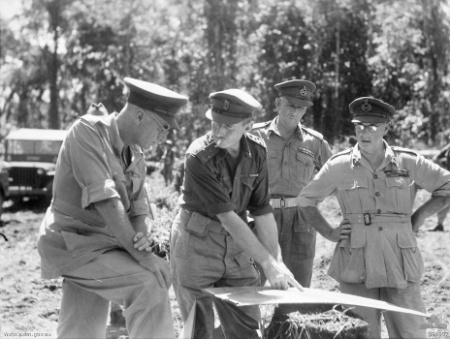
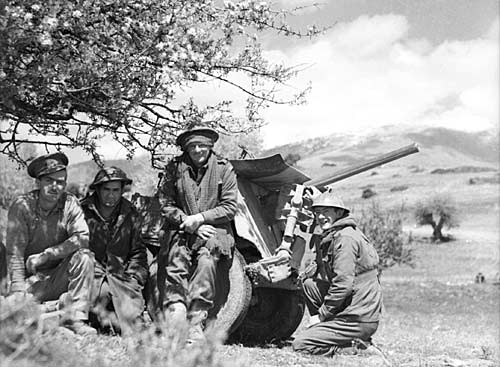
Lieutenant General V.A.H. Sturdee, OC Commonwealth Division, has Red Army positions explained to him on the map by Lt-Col H. H.(“Tack”) Hammer, CO F/4th Light Horse Battalion, during his visit to HQ 1st “ANZAC” Brigade on the Syvari Front. Behind “Tack” Hammer is Lt-Col W. Bridgeford of the Divisional Staff, with Brigadier S.G. Savige, OC 1st “ANZAC” Brigade to the right with hands on hips.
In 1939, the Chief of the General Staff of the Australian Army, Lieutenant General Ernest Squires, implemented a reorganisation of the Australian Army in which the old military districts were replaced by larger commands led by lieutenant generals. On 13 October 1939, Sturdee was promoted from Colonel to Lieutenant General and assumed control of the new Eastern Command, with responsibility got supervising the raising, training and equipping of the new Second Australian Imperial Force units being formed in New South Wales, as well as the now-conscript Militia. On 5th January 1940 he accepted a demotion to Major-General in order to command the Commonwealth Division in battle in Finland. As a commander of the Division in combat in Finland, he proved to be an effective and capable combat leader, fighting a number of large scale engagements with the Red Army on both the Karelian Isthmus and on the Syvari.
After the Winter War ended, he returned to Australia where he was immediately restored to his rank of lieutenant general and appointed as Chief of the General Staff, replacing the previous Chief of the General Staff, General Sir Brudenell White, who had died in the Canberra air disaster of 13 August 1940. On the entry of Japan into WW2, Sturdee proceeded to conduct a defence of the islands to the north of Australia against the advancing Japanese forces with the limited forces available. In 1942, he advised the government to divert the Second Australian Imperial Force troops returning from the Middle East to Australia, advice which was follwoed. He then became head of the Australian Military Mission to Washington, DC, where he represented Australia before the Combined Chiefs of Staff.
As commander of the First Army in New Guinea in 1944–45, Sturdee was charged with destroying the enemy when opportunity presented itself, but had to do so with limited resources, and without committing his troops to battles that were beyond their strength. When the war ended, Sturdee took the surrender of Japanese forces in the Rabaul area. Now one of the Australian Army’s most senior officers, he succeeded General Sir Thomas Blamey as Commander in Chief of the Australian Military Forces in December 1945. He became the Chief of the General Staff a second time in 1946, serving in the post until his retirement in 1950. During this term, he had to demobilise the wartime Army while developing a structure for the post-war Army that included regular combat formations. Sturdee was this instrumental for laying the foundations for the Australian Regular Army as it exists today.
Acting Brigadier John Gordon Noel Wilton, 2IC, Commonwealth Division
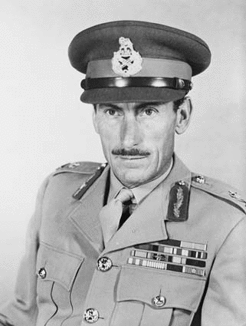
General John Gordon Noel Wilton, photo from 1963
John Gordon Noel Wilton was born on 22 November 1910 in Sydney and was educated principally at Grafton High School. He chose a military career, despite severe reductions in the strength of the Australian military forces in the 1920s, entering the Royal Military College, Duntroon in 1927. After graduating in second place academically on 9 December 1930, Lieutenant Wilton began service with the British Army as an artillery officer. Of the twelve graduates from Duntroon in 1930, four were accepted by the British Army, four entered the Royal Australian Air Force and only four remained in the Australian Army. During the 1930s, Wilton gained wide experience in the British Army, being stationed in the United Kingdom, India and Burma, where he became familiar with the problems of jungle operations in South-East Asia, experience which was to be of great use to him in Finland and later in South East Asia.
After more than nine years of successful service with the British Army, Wilton was offered the post as 2IC of the Commonwealth Division under Sturdee and immediately accepted, joining the volunteers on their ships in Belfast for the short voyage to Petsamo, where they disembarked in late March 1940. He saw the disparate units of the Division through a savagely intense training period conducted by their Finnish instructors, a period in which he spared no-one, least of all himself. In May and June 1940, during the Maavoimat’s advance down the Karelian Isthmus, he played a significant command role in helping stem a strong Red Army counterattack which threatened the communications of the advancing Commonwealth Division. Wilton’s quick and cool planning work for the attack which drove the Red Army back were a model of clarity and tactical soundness.
After the Winter War, Wilton was glad to head to the Middle East where he fought in 1940 and 1941. Through 1942 and 1943 he was in New Guinea as senior operations staff officer to Major General Savige, where he played a major role in planning and directing the advance on Salamaua in mid-1943. He completed the 3rd division’s part in what Savige described as the “toughest operation problem I ever faced” with high praise for his skill and courage. He then served in the Australian military mission in Washington, gaining insights into the complexities of wartime diplomacy, strategic coordination and logistic planning before returning to the headquarters, Australian military forces, South-West Pacific, as a Colonel on the general staff in 1945. In 1946, he became deputy director of military operations at Army HQ and in 1947 he became director of military operations and plans for the following four years.
In July 1950, he was a member of an Australian military mission to Malaya, following which led a second mission in February 1951. He warned the British that if they did not maintain sufficient forces in Malaya for dealing with internal security problems, Australia would be unlikely to assist with defence against external attack. After attending the Imperial Defence College, London in 1951 and 1952 Wilton was selected for the army’s key operational command, the 28th British Commonwealth Brigade in Korea, a composite brigade of Australian, British, Indian and New Zealand units. His divisional commander, Major General West, regarded Wilton as an outstandingly good brigade commander.
In the four months of operations after Wilton’s arrival, the brigade restored a potentially disastrous situation created by an American force which had relieved it for some two months on the Jamestown line. A determined and skilful patrol policy drove the Chinese back from the allied front line and re-established Commonwealth control over no-man’s land. On his return from Korea, Wilton rose steadily through senior positions in army headquarters and, as a Major General, was commandant of Duntroon, from 1957 to 1960, and chief of SEATO military planning office in Bangkok from 1960 to 1963. He was appointed Chief of the General Staff in 1963 and assumed the responsibilities which accompanied Indonesia’s confrontation of Malaysia, the development of Papua-New Guinea’s defences, the introduction of conscription and the undertaking of a major commitment to the Vietnam war.
In 1966 he was appointed to the most senior service position of that time as Chairman of the Chiefs of Staff Committee. In 1968, he became the fourth Australian army officer, after Chauvel, Monash and Blamey to attain the rank of full general. He retired in 1970 and in 1973 was appointed by the Whitlam Government as Australian Consul General in New York for two years. General Wilton was quiet, undemonstrative and even a little shy but with a first class brain, he wrote well, he argued clearly and when he spoke he commanded ready attention for the worth of what he said, rather than the way in which he said it. He died in 1980, at the age of 70.
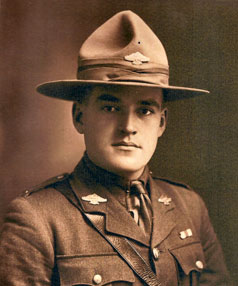
Brigadier Stanley Savige, Commanding Officer, 1st “ANZAC” Brigade, Commonwealth Division
Stanley Savige was born 26 June 1890, in Morwell, Victoria, the eldest of eight children to Samuel Savige, a butcher, and his wife Ann Nora, née Walmsley. His grandfather had arrived in Australia as a free settler in 1852 from England. Stan Savige left Korumburra State School (where he had been in the school junior cadets) at the age of twelve to work as a blacksmith’s striker. The family moved to Melbourne in 1907, where Savige worked in a variety of jobs and also joined the Prahran senior cadets for 18 months from 1907 to 1909. He became a scoutmaster, forming the First Yarra Troop and was an active member of the Baptist Church, where he was a Sunday school teacher. Through his church activities, Savige met Lilian Stockton, to whom he became engaged on New Year’s Day, 1914. He enlisted in the First Australian Imperial Force on 6 March 1915, and left for Egypt on the transport Euripides on 8 May 1915. He was promoted to corporal on 30 April and lance sergeant on 8 May. In the Middle East he fought at Gallipoli and became company sergeant major on 20 September, following which he was commissioned as a Second Lieutenant on 9 November 1915. During the evacuation of Gallipoli in December 1915, Savige was one of three officers chosen to serve with the battalion rearguard.
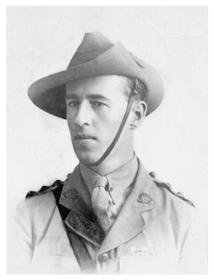
Sir Stanley George Savige of the Australian Imperial Force, photographed as a Captain in 1918.
He went with the 2nd Division to France in March 1916, where he was given command of the battalion scout platoon, leading a number of night patrols into no man’s land. On 12 April, he became battalion intelligence officer and was promoted to Lieutenant on 1 May. His Brigade Commander had him attached to 6th Infantry Brigade headquarters as a trainee brigade intelligence officer. He was promoted to Captain on 15 September and was appointed Adjutant on 3 February 1917. Savige was Mentioned in Despatches and recommended for the Military Cross. His citation read: “For conspicuous gallantry in action at the Hindenburg Line on 3rd May 1917. After assisting to reorganise a party of broken infantry he acted as staff officer to the Senior Officer in the captured position. In this capacity he displayed most commendable coolness, energy and ability, in securing reliable information as to the progress of the action.” He was Mentioned in Despatches a second time for his role in the Battle of Passchendaele, although he was originally recommended for a bar to his Military Cross. He became Assistant Brigade Major of the 6th Infantry Brigade on 10 September and was Acting Brigade Major from 22 November until 11 January 1918.
Following the abdication of the Russian Tsar in 1917, the Caucasus Front had collapsed, leaving Central Asia wide open to the Turkish Army. The British War Office responded with a plan to send a force of hand-picked British officers and NCOs deep into the Caucasus to organise any remaining Russian forces or civilians who were ready to fight the Turkish forces. A request for Australian officers resulted in some twenty officers, drawn from “the cream of the cream” of Australian leaders, including Savige. This force was known as Dunsterforce (after its commander, Major General Lionel Charles Dunsterville, the inspiration for the “Stalky” of Rudyard Kipling’s novel “Stalky & Co”). Dunsterforce arrived in Baku in August 1918, hoping to raise an army from the Christian Georgian, Armenian and Assyrian people who had supported the Russians and historically feared the Turks, but “the task proved superhuman”.
On patrol deep in the Caucasus with a small group of men, Savige came across a column of seventy thousand Assyrian refugees fleeing the Turks. He deployed his small force, along with some armed refugees, to form a rear guard to hold back the Persians, Kurds and Turks who were murdering the refugees and carrying off the young girls as slaves. One of the small group of eight men under Savige’s command was a New Zealander, Captain Robert Kenneth Nicol, a tough little painter from Lower Hutt. Like all other men in the force, he was handpicked for “Dunsterforce”, or the “Hush Hush Brigade” as the men from Canada, South Africa, Australia and New Zealand called it. “It was made clear to them … their duties would be of such a hazardous nature few could come through the experience alive. The unknown risks were cheerfully accepted,” the Official History of the New Zealand Rifle Brigade says. In August 1918, a group of Dunsterforce men, led by Captain Stanley Savige, decided to protect the ragged column of Assyrians, 24 kilometres long. The band of nine included two New Zealanders, Captain Nicol and Sergeant Alexander Nimmo from the Otago Battalion. The refugees were trying to walk 1,000 kilometres from Urmia in Persia (Iran) to the plains of the Diala River, near Baghdad. “Large bodies of Turkish troops and Kurdish irregulars were raiding the column, murdering the people and carrying off girls to their harems, together with whatever loot they could lay their hands on,” Captain Savige wrote in his dairy.
Captain Robert Kenneth Nicol, New Zealand Army, who fought under Savige’s command (based on an article by Paul Easton in “The Dominion” Newspaper, “Tough little Kiwi fought to the death”)
Outnumbered by more than 100 to one, the men guarded the column from the rear. At the village of Aydisheh on August 5, Captain Nicol moved forward to help control some unruly mules carrying ammunition. His nephew Lindsay Grigg, 82, a retired surgeon from Canberra, researched the story. “Three men were attacked from the rear and sides. Captain Nicol went to give support, and caught up with Nimmo from the Otago Regiment,” he said. “He sent Nimmo forward to collect the ammo, said, “Give me your rifle” and gave covering fire. He stood up and was immediately killed. Two sergeants tried to get him. Both had their mounts shot out from under them, but crawled to safety“. One of those who made it to safety was almost certainly Nimmo. Nicol’s body was never recovered and is now lost in the earth of modern day Iran – but his sacrifice will never be forgotten. He was 21 years old. Sergeant Nimmo survived the war, and received an award for gallantry for his actions. After a harrowing six-week trek the refugees reached safety.
Historian Charles Bean later wrote that: “The stand made by Savige and his eight companions that evening and during half of the next day against hundred of the enemy thirsting like wolves to get at the defenceless throng was as fine as any episode known to the present writer in the history of this war.” Savige was subsequently decorated with the Distinguished Service Order for his efforts on this occasion. His citation read: “For conspicuous gallantry and devotion to duty during the retirement of refugees from Sain Kelen to Tikkaa Tappah, 26/28th July, 1918; also at Chalkaman, 5/6th August. In command of a small party sent to protect the rear of the column of refugees, he by his resource and able dispositions kept off the enemy, who were in greatly superior numbers. He hung on to position after position until nearly surrounded, and on each occasion extricated his command most skilfully. His cool determination and fine example inspired his men, and put heart into the frightened refugees.”
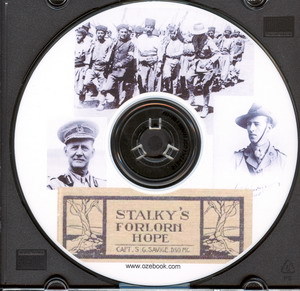
“Stalky’s Forlorn Hope”
Savige later wrote a book about his experiences in Persia, entitled “Stalky’s Forlorn Hope”, which was published in 1920. (If you’re interested, this is available as an ebook from www.ozebook.com with some additional material on Dunsterforce. In relation to Finland, it’s also interesting to note that a flotilla of Royal Navy Coastal Motor-Torpedo Boats operated in the Caspian Sea in support of this operation in a somewhat similar manner to those CMB’s of Captain Augustus Agars’ that operated from Finland against the Bolshevik Navy in Krondtstadt. Agar’s books make a brief mention of this Caspian Sea Flotilla, and there is a good article about it in the Naval Review – see here http://www.gwpda.org/naval/caspian.htmand also at http://www.naval-review.co.uk/issues/1920-2.pdf).
In November 1918, Savige was evacuated to a hospital in Bombay, suffering an attack of Malaria. He returned to Australia in January 1919 and finally married Lilian Stockton on 28 June 1919. He had to struggle to re-establish himself in civilian life and was unemployed for a time before finding work with a Melbourne wholesale firm. In 1923 he became sole agent for the Returned Soldiers’ Mill in Geelong, eventually he became sole agent for all of Australia. In 1930, he ran unsuccessfully for the Electoral district of Caulfield on the Nationalist Party of Australia ticket. In 1923, Savige founded “Legacy Australia” as an ex-servicemen’s club, but it soon became a charitable organisation focusing on war widows and orphans. For the next 26 years, due to his commitment, energy and enthusiasm, Savige’s name became inseparable from both the club and the movement. Savige joined the Militia on 19 February 1920, with his AIF rank of Captain. Commanding a Battalion, and then a Brigade, he was promoted to Major on 1 July 1924, Lieutenant Colonel on 1 July 1926, Colonel on 1 June 1935, and Brigadier on 1 May 1938. His promotion, while neither meteoric nor exceptional, was still far faster than that enjoyed by regular officers who had been majors in the AIF but remained at that rank for nearly twenty years, only to find themselves junior to Militia officers like Savige. For his part, Savige was a critic of the regulars.
Shortly after the outbreak of World War II in September 1939, Prime Minister Robert Menzies announced the decision to form a Second Australian Imperial Force. He further directed that all commands in the new 6th Division would go to militiamen.and Lieutenant General Sir Thomas Blamey, newly appointed commander of the 6th Division, selected Savige to command its 17th Infantry Brigade. He and Blamey had worked together when Blamey had commanded the 3rd Division from 1931 to 1937 and Savige was “almost fanatically loyal to Blamey through bad as well as good times”. However, the decision to send volunteers to Finland intervened and with Blamey’s strong support, Savige was appointed commanding officer of the 1st Brigade. Considering it’s inexperience in battle, the 1st Brigade did well in its first battles on the Karelian Isthmus, as a result of which Savige was appointed a Knight of the Order of the White Rose of Finland, with Swords. His citation read: “Brigadier Savige commanded the 1st Commomwealth Div. Inf. Bde in the Battles of Summa, Uusikirkko and the pursuit into the outskirts of Pietari (Leningrad). He showed fine control, organisation and leadership throughout, culminating in an excellent example of initiative and drive which broke the enemy flank west of Terijoki at Raivola, thus accelerating the enemy retreat and final defeat”.
In the tough offensive fighting on the Isthmus and the later defensive and offensive battles on the Syvari, Savige led from the front. He constantly visited forward positions and flew over frontline areas to let his men know that the CO was on the job. In this, he found the Ilmavoimat STOL aircraft provided to each Division to be invaluable and this was something he would constantly press for after he returned to the Australian forces in the Middle East. In the great defensive battles of late July and August 1940 on the Syvari Front, Savige excelled once more, this time in the tactical defensive. For his part in the fighting, he was awarded a bar to his Order of the White Rose.
In this instance, his citation read: “Brig. Savige had control of the 1st Brigade, Commonwealth Division during the Battle on the Syvari from 24 July 40 until heavy fighting ceased on 26 Aug. 40. The battle was finally won on 11 Sep. 40 — the credit for the Brigade’s success in defeating what was a significant enemy attack made with large numbers of armour, infantry and artillery must rest with Brig. Savige under whose command the back of the enemy’s offensive on his sector was broken. The nature of the country rendered great assistance to the attacker, and careful planning and decisive control of the defensive battle alone enabled the enemy offensive to be defeated. The supplying of our forward troops at this time was also a terrific problem that was overcome”.
Savige – “The Right Man for the Right Job”
As the “Official History of the Commonwealth Division in the Winter War” puts it, Savige “…was a skilful manager of men, using an easy friendly manner and a slanginess of speech to decrease the distance that separated him from his subordinates. He was a sage leader in battle whose approach to all problems was practical and objective. He could write clearly and interestingly and enjoyed writing, whether it was orders and doctrine for future operations or accounts of past battles; he had a sense of history and the doings of his commands were usually more fully recorded than those of companion formations.”
Following the end of the Winter War, Savige was transferred to the Middle East where Blamey immediately restored him to command of the 17th Infantry Brigade. The combat and command experience Savige had gained in 6 months of battle in Finland stood him in good stead as he led the 1st Brigade in the Battle of Bardia and then in the Battle of Tobruk. The 17th Infantry Brigade would then fight in Greece in April 1941, where Savige was placed in charge of Savige Force, consisting of 4 Infantry Battalions, with armour, artillery, engineer and other support. He then covering the Allied flank in a successful fighting withdrawal, arriving back in Palestine on 1 May 1941 to rebuild his brigade. For the campaign in Greece, Savige received a further Mention in Despatches. After successfully leading a composite Brigade in the fighting in Syria against the Vichy French, Savige was sent back to Australia on a recruiting campaign, arriving on 5 January 1942 to find himself promoted to command of the Australian Army’s 3rd Division. Two days later he was promoted to Major-General. Savige threw himself into the task of preparing his command for the war with Japan, weeding out the physically unfit and incompetent. By May, he had removed some 60 officers. In October, Savige became acting corps commander. In March 1943, Savige departed for Port Moresby (New Guinea) where he commanded in the Salamaua-Wau campaign. Savige was awarded a Companion of the Order of the Bath for his services in the Salamaua campaign.
In February 1944 he was appointed to command I Corps in Queensland and in April 1944 his Corps was renamed II Corps and assumed command of New Guinea Force. After New Guinea Force was disbanded, Savige’s II Corps was ordered to “reduce enemy resistance on Bougainville Island as opportunity offers without committing major forces”. GHQ reckoned that there were no more than 12,000 Japanese left on Bougainville, while LHQ estimated 25,000. There were 40,000. On 8 September 1945, Savige accepted the surrender of the Japanese forces. After co-ordinating demobilization and dispersal, Savige transferred to the Reserve of Officers in June 1946. He went back into business successfully, was a leader in Melbourne’s Anzac Day marches, a patron of a number of his former units’ associations, and honorary colonel of the 5th Battalion (Victorian Scottish Regiment). Savige was appointed a Knight Commander of the Order of the British Empire (Military Division) on 8 June 1950. Savige died on 15 May 1954.[2] He was accorded a funeral with full military honours at St Paul’s Cathedral, Melbourne. A crowd of 3,000 mourners watched him laid to rest at Kew Cemetery. In August 2006, Australian-Assyrian community leaders from Sydney and Melbourne gathered at Savige’s grave site to commemorate his role in saving Assyrian refugees in 1918.
Such was one of the two Australian Army Brigade commanders who fought in Finland with the Commonwealth Division. The other was……
Brigadier John Joseph Murray, Commanding Officer, 2nd “Empire” Brigade, Commonwealth Division
Murray was born on born 26 April 1892 in Sydney, New South Wales the fourth child of John Murray, an Irish immigrant labourer, and his wife Margaret. He was educated at the local Catholic school before being taken on as an apprentice salesman for Sydney firm Anthony Hordern & Sons in 1910. He then joined the Australian Citizens Military Forces where he did two years service, before joining the 33rd Regiment in 1913. He was commissioned as a Second Lieutenant on 6 March 1915 and transferred to the first Australian Imperial Force (1st AIF), and set sail for Egypt. The 5th Division, in which he was an Officer, soon moved from Egypt to France where they were thrust into the brutal fighting of the Western Front.
In the horrific battle of Fromelles Murray was cited for his “courage and tenacity” in leading a charge and holding the position he had captured. He was awarded the Military Cross and promoted to Major in June 1917, becoming known for his exceptional leadership and daring night raiding of enemy trenches. In September 1918 during the intense fighting of the Second Battle of the Somme, Murray was again cited for his fine leadership, and was later awarded the Distinguished Service Order. He returned home to Australia in May, 1919. Although he was happy to return to his job at Anthony Hordern & Sons in Sydney, Murray also returned to his former militia role in the Australian Citizens Military Forces, where his experiences as a commander in World War I proved invaluable. On 4 January 1923 John Murray married Mary Madeline Cannon at St Mary’s Cathedral, Sydney. His civilian career prospered when he was appointed Manager of the Delivery Department at Anthony Hordern & Sons.
By 1925 Murray was promoted to Lieutenant Colonel and given command of the 56th Battalion, which he held until 1930, when he transferred to command of the 53rd Battalion. Murray enjoyed both his civilian roles, and his military life, and continued to further his career in both. In 1932 he was appointed chairman of the New South Wales Transport Advisory Committee, and he was appointed Managing Director of Associated Transport Services Ltd in 1935. From 1934 until 1938 Murray was the Commanding Officer of the Australian Army Service Corps, 1st Division. With War again looming on the horizon, Murray was given the command of the 9th Infantry Brigade but on the announcement of the raising of a Volunteer Force to fight in Finland, he promptly put his name forward. His experience as a battle-hardened leader in WW1, as well as his subsequent command experience in the inter-war years, led to Murray being selected for command of the 2nd Brigade.
Brigadier John Joseph Murray, CO of the Commonwealth Division’s 2nd Brigade. Photo taken in Finland on the Syvari Front shortly before the fierce Russian offensive of late July 1940.
Despite their lack of preparedness, equipment and training, on arrival in Finland and after a short weapons and equipment familiarization and unit training period, the Commonwealth Division were thrust into the front on the Karelian Isthmus. Murray’s 2nd Brigade met the last Red Army attacks on the Isthmus head-on and then participated in the Maavoimat offensive that drove down the Karelian Isthmus to Leningrad. Unlike the 1st Brigade, the 2nd saw no great battles on the Isthmus, their participation in the offensive was more of a steadily grinding offensive that maintained a constant forward momentum that took them to the outskirts of Leningrad. On the outskirts of Leningrad and again on the Syvari Front after the Commonwealth Division were transferred there, Murray’s experiences of trench warfare and night-raiding in WW1 proved invaluable.
When the great Red Army offensive of July and August 1940 broke on the Finnish defensive positions, Murray’s 2nd Brigade at first fought fiercely and then fell back slowly into a series of previously prepared defensive positions, inflicting enormous losses on the enemy as they did so. After being relieved in place following two weeks of intensive combat, the 2nd Brigade regrouped and requipped before participating in an offensive action to relieve pressure on the neighbouring Spanish División Azul, which had faced a continuous Red Army attack in strength from the onset of the offensive.
This counterattack was highly successful, trapping three Red Army Divisions on the wrong side of the Syvari and cutting them off in a pocket that was eliminated at the same time as a series of counter-attacks drove the Red Army back to their starting point. For his command of the 2nd Brigade in this decisive action, Murray was appointed a Knight of the Order of the White Rose of Finland, with Swords. Immediately after thus action, under Murray’s command, the 2nd Brigade would take part in the offensive across the Syvari, attacking with the élan that was a mark of the AIF infantry throughout both WW1 and WW2. This would be the last combat that the 2nd Brigade would see in the Winter War.
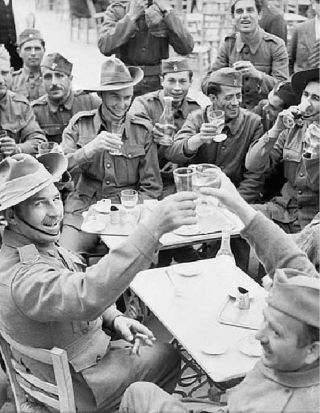
Australian Soldiers of the 2nd Brigade, Commonwealth Division, having a few drinks after the ceasefire was announced with soldiers of the neighbouring División Azul
Photo Left: Australian Soldiers of the 2nd Brigade, Commonwealth Division, having a few drinks after the ceasefire was announced with soldiers of the neighbouring División Azul to whose assistance they had come when the Spanish Division was under heavy pressure from the Red Army. The 2nd Brigade made a decisive breakthrough at a point weakly held which enabled them to penetrate into the Red Army rear and throw the attack on the División Azul into confusion. In heavy fighting in early August 1940, the 2nd Brigade, the División Azul and a Finnish Combined Arms Regimental Task Force would trap three Red Army Divisions and two Red Army Tank Regiments that had crossed the Syvari in a pocket and eliminate them (incidentally, capturing large amounts of Red Army equipment intact. The war booty resulting from this failed Soviet offensive would provide the Maavoimat with enormous stockpiles of equipment, much of which would later to be used to help equip firstly, the Polish Home Army and secondly, newly created Infantry Divisions from the Baltic States of Estonia, Latvia and Lithuania as they were liberated from the Germans. Much of the undamaged armour and artillery would be used to strengthen existing Maavoimat formations.
Immediately after the end of the Winter War, Murray was advised that he had been given command of the Australian Army’s 20th Brigade which had sailed for the Middle East in October 1940 to begin training in Palestine, where he would join them on arrival. In 1941, despite the lack of preparedness, equipment and training, Murray’s 20th Brigade were thrust into the front in Libya and on 4 April 1941, they met Erwin Rommel’s Afrika Korps at Er Rigima head on. Murray’s experiences in Finland in a similar fight against the Red Army enabled the Australians to frustrate Rommel’s push, but despite delaying them, Rommel’s force was too great to repel, and eventually Murray was forced to conduct a fighting withdrawal of the 20th into Tobruk. On 14 April, Rommel tried to press his advantage and take the city, but the 20th Brigade once more doggedly repelled the Germans, who disastrously suffered heavy casualties. For his leadership that day, Murray was granted a bar to his Distinguished Service Order. In July 1941, Murray had overall command of fortress Tobruk. In November 1941, he was Mentioned in Despatches for his command of the resistance to Rommel. However, at 49 years old and after more than a year of intensive fighting, it proved difficult for Murray to sustain frontline action. Blamey ordered Murray home to Australia where he recommended he be given a recruiting post.
Murray returned to Australia in January 1942, just in time for Japan’s major thrust southwards towards New Guinea. Rather than being given the recruiting desk job that Blamey had earmarked him for, the Australian Command immediately promoted him to temporary Major General and command of the 10th Division. In August 1942 he took over command of the 4th Division. In October 1944, he was made General of the Rear Echelon and from March 1945 he commanded the Northern Territory Force. In January 1946, after nearly 31 years of military service, he resigned from the Australian Army. Murray successfully returned to his civilian life after World War II and was made Australian trade commissioner to New Zealand from 1946 until 1949 and then trade commissioner to Ceylon briefly in 1949. However the demands of two world wars and a fulfilling career caught up with him all to soon, and he died in September 1951. He received a funeral with full military honours.
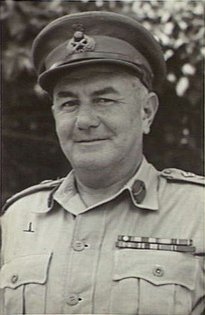
Acting Lieutenant-Colonel Heathcote Howard (“Tack”) Hammer, Commanding Officer, Australian F/4th Light Horse Battalion, 1st “ANZAC” Brigade, Commonwealth Division
Major Heathcote Howard (“Tack”) Hammer of the 17th Light Horse (Machine-Gun) Regiment had been one of the more senior militia officers who had volunteered for service in Finland – selected as Commanding Officer of the F/4th Light Horse Battalion (the F stood for Finland), he had been promoted to the rank of acting-Lieutenant-Colonel and dispatched by General Blamey with a simple “Good luck Tack, you’re on your own from now on. Make whatever decisions you need to and don’t look to any from back here.”
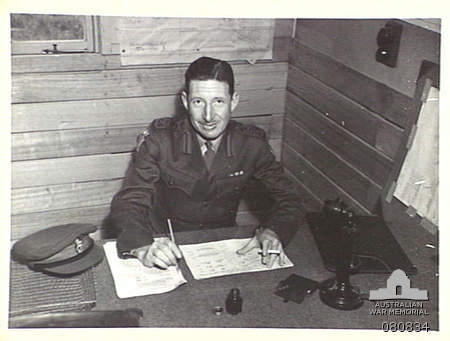
Lieutentant-Colonel Heathcote Howard (“Tack”) Hammer: Commanding Officer of the Australian F/4th Light Horse Battalion. Photograph taken in his command bunker on the Syvari Front, Finland, Autumn 1940.
Heathcote Howard Hammer (1905-1961) was born on 15 February 1905 at Southern Cross, Western Australia, second son of Victorian-born parents William Hammer, miner, and his wife Ada May, née Williams. Educated at the Ballarat School of Mines, Victoria, he took a local job before becoming a commercial traveller. At St Patrick’s Catholic Cathedral, Melbourne, on 26 October 1935 he married Mary Frances Morrissey, a clerk; they were to have two children before being divorced in 1955. Having joined the Militia in 1923, he was commissioned in the 8th Battalion in February 1926, transferred to the 17th Light Horse (Machine-Gun) Regiment in 1937 and promoted major in 1939. “Tack” Hammer volunteered for the Finland Force in January 1940 and was appointed Commanding Officer, with the rank of Acting Lieutenant-Colonel. He sailed for Finland with the Volunteer Battalion in February – and the command soon brought him the operational experience he craved. He led the Battalion with distinction in the fighting on the Karelian Isthmus through May and June 1940.
One of the most thoughtful and successful Australian commanders of World War II, Hammer was a “tireless, fiery and colourful leader”, always immaculately dressed whether in the forests and swamps of Finland, the deserts of the Middle East or later in the jungle of the Pacific islands. “Hard as Nails” was the motto he proclaimed at his first inspection of the Volunteers of his 4th Light Horse in Finland and it inspired his training methods throughout the war. He understood and expounded the logistical basis of battle: “Weapons, ammunition and food are treasures in this country”, he told his troops on the way to the front on the Karelian Isthmus, urging them to fight their battles “wisely”. He was also an imaginative tactician, as his night operations against the Red Army on the Isthmus demonstrated. On the Karelian Isthmus he rapidly learned to employ the available artillery, tanks and air power with the aim of limiting casualties among his infantry. His capture in a night assault of a commanding feature strongly held by the Red Army that the Aussies nicknamed Spion Kop outside Uusikirkko on 26 June 1940 was brilliantly planned and executed and resulted in a rapid penetration in depth of the Red Army defensive positions.
After the conclusion of the peace negotiations between Finland and the Soviet Union, he returned to the UK and thence to the Middle East, where he assumed his permanent rank and was posted as brigade major of the 16th Brigade in March 1941. After participating in the disastrous campaign in Greece, his Brigade built defences in Syria. In January 1942 he was appointed to command the 2nd/48th Battalion, 9th Division; Returning to Australia in February 1943, he took command of the 15th Brigade in New Guinea in July. Following strenuous operations which led to the capture of Salamaua in September, Brigadier Hammer was given a brief time to rest and train his men before they joined the 7th Division in the Ramu Valley in January 1944. There they took part in the clearing of the Huon Peninsula and entered Madang on 24 April. Hammer was awarded a Bar to the D.S.O. (for Salamaua) and appointed C.B.E. (for the Ramu). In December 1944 the 15th Brigade moved to Bougainville. Where they went into action in April 1945. When the Japanese surrendered in August, he set up schools and courses to prepare his men for their return to civilian life. Mentioned in dispatches, he transferred to the Reserve of Officers on 29 November 1945.
As controller of demobilization in Victoria (1945-46), and as an assistant-commissioner for repatriation (1946-47) and a member of the Repatriation Commission from July 1947, Hammer remained close to the ex-service community. After resigning from the Army in September 1947 and going into private business, he returned to the Militia as commander, 2nd Armoured Brigade (1953-56), and was an aide-de-camp to Queen Elizabeth II in 1954. Promoted Major-General, he commanded the Australian Army’s 3rd Division from 1956-59 and was appointed honorary Colonel of the 8th-13th Victorian Mounted Rifles in 1959. In the postwar army he threw himself into training with the same creativity and drive that had distinguished his career in the A.I.F. On 14 January 1956 at the College Church, Parkville, Melbourne, Hammer had married Helena Irena Olova, née Vymazal, an Austrian-born interpreter. He died on 10 March 1961 and was buried with full military honours.
Acting Lieutenant-Colonel Bernard James Callinan, Commanding Officer, Australian F/12th Light Horse Battalion, 2nd “Empire” Brigade, Commonwealth Division
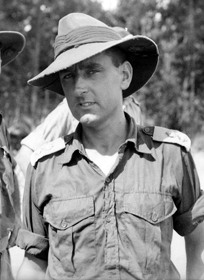
Acting Lieutenant-Colonel Bernard Callinan, OC F/12th Light Horse, Summer 1940 on the Syvari Front
Bernard James Callinan AC, CBE, DSO, MC (1913 – 1995) was an Australian soldier, civil engineer, businessman, and sports administrator. Callinan had joined the Citizen Force in 1936 as a Lieutenant in the Engineers. He was promoted to Captain in 1938 and Major in 1939. An outstanding young officer, he had first volunteered for the 2nd AIF but would then volunteer for Finland, where he was given command of the F/12th Light Horse and promoted to Acting Lieutenant-Colonel. He would lead the F/12th decisively and effectively in battle throughout the Winter War, only to be severely wounded in the last days of the fighting on the Syvari – but not before introducing Cricket to Finland. He returned to the UK and then to Australia to recover.
After recovering from his injuries, he would return to his Substantive rank of Major and be appointed to command the 2/2 Independent Company commandos who fought as part of Sparrow Force on Timor against the Japanese in 1942. Upon returning to Australia, he was promoted to Lieutenant-Colonel and shortly after assumed command of the 26th Battalion, which served in New Guinea and Bougainville. He later commanded the 58th/32nd Battalion and was awarded the Distinguished Service Order and Military Cross for outstanding leadership and gallantry.
Sir Bernard held many positions in the commercial field, including director of CSR Ltd, director of the British Petroleum Company of Australia, chairman of the new Federal Parliament House Construction Authority, commissioner of the Australia Broadcasting Corporation and the State Electricity Commission of Victoria (SEC), deputy chancellor of LaTrobe University and president of the Institute of Engineers Australia. From 1963 he served as Commissioner of the SEC Victoria. Sir Bernard joined the Melbourne Cricket Club (MCC) committee in 1966 and served as president from 1980 to 1985. He fought to retain the Victorian Football League (VFL) grand final at the Melbourne Cricket Ground (MCG), and was a long-serving Victorian Amateur Football Association(VAFA) Patron-in-Chief. He died in 1995.
The New Zealand/Australian Army’s Composite (Finland) Field Regiment in the Winter War
One further composite Australian and New Zealand Army unit would volunteer and fight in Finland – the New Zealand and Australian Army’s Composite (Finland) Field Regiment, an artillery unit which, as with the ANZAC Battalion, was made up of both New Zealanders and Australians but as with the ANZAC Battalion, was under New Zealand command. Once in Finland, the Field Regiment would be attached to the ANZAC Brigade, formed from the ANZAC Battalion, the 28th Maori Battalion and the Australian F/4th Light Horse Battalion together with other supporting units, largely formed from Australian volunteers.
The New Zealanders in the Field Regiment had signed up in response to the call for Volunteers to fight against Germany. Hundreds of youthful volunteers had converged on the Hopu Hopu Camp and joined a small advance party to form the fledgling 4th Field Regiment, New Zealand Artillery. Little did they know at the time that they would end up fighting not in the Middle East or against Germany as they had as first expected, but in the snow, swamp and forests of Finland, a country most of them had barely heard of.
Compulsory military training had been abolished in New Zealand for almost a decade before World War II. The young men who assembled on October 4, 1939, had had precious little, if any, military experience. But they had patriotism and enthusiasm in abundance. Some were impatient that the war might end before they could become involved in it. How many would have dreamed that, five years on, the end would not be in sight and that by then they would have fought in Finland, Greece, the Middle East and then against the Japanese in the Pacific?
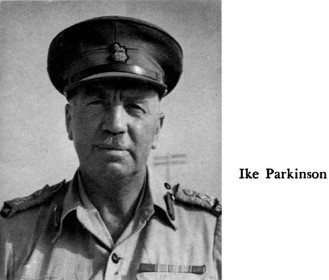
Lieutenant Colonel “Ike” Parkinson, CO, 4 Field Regiment (New Zealand Army)
The task of moulding this motley lot of individuals into a disciplined team of skilled gunners fell to instructors from the tiny regular force (Royal New Zealand Artillery) and former part-timers of the New Zealand Territorial Army. This nucleus of experienced officers and non-commissioned officers was led by the commanding officer and “father of the regiment”, Lieutenant Colonel “Ike” Parkinson and his RSM, Warrant Officer Class One, W.J. Fitzgerald, both long-serving regular soldiers and veterans of World War I.
Over the next three months they trained their fledglings well and the 4th Field Regiment sailed for the Middle East on January 6, 1940, on the Empress of Canada in a convoy with other units of the 1st Echelon. The journey took them via Sydney, Perth, Colombo and the Red Sea to Port Tewfik at the Suez end of the canal, then by rail to what was supposedly their final destination, Maadi Camp near Cairo. Many more contingents were to follow that route in years to come, but no others would follow the route that half the men of 4 Field Regiment took next. Just as they had settled in to Maadi Camp, they were asked for volunteers to step forward to go to Finland to join the men assisting that small country in its life and death struggle against the Soviet Union. To a man they chose to volunteer to fight for a country most of them knew next to nothing about. Names were placed in a bucket and drawn, with half the Regiment going to the new Composite Regiment, together with a similar number of Australians who had likewise volunteered.
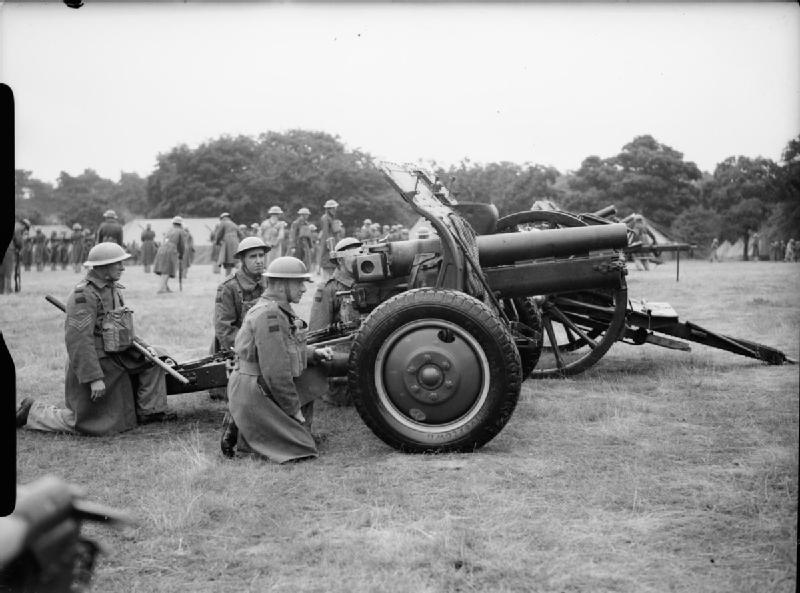
In mid-March 1940 the composite Regiment once more embarked, this time on a Finnish ship that had made the long journey across the Mediterranean to Alexandria to pick them up. Under the command of Lt. Col G B “Ike” Parkinson, the 42 Officers and 644 OR’s of the Composite (Finland) Field Regiment were joined at the end of March on the ship in Glasgow by 2 Batteries of the New Zealand Army’s 7 Anti-Tank Regiment which had arrived by then in the UK. The Regiment consisted of the RHQ, 25 Bty, 26 Bty and 27 Bty (12 x 25 pdr guns in total), and 2 attached units – 9 Light Aid Detachment (1 Officer, 13 ORs) and a Signals Section.
Men of the New Zealand Army’s 7 Anti-Tank Regiment training in the UK shortly before leaving for Finland
They sailed as part of a growing convoy which included the Polish ship MS Batory, carrying the 5th Battalion Scots Guards, the Australians, Rhodesians, South Africans and the “De La Rey Battalion,” a unit of Boer Volunteers who would have nothing to do with the British but who were friendly enough with the New Zealanders and Australians. The convoy arrived in the Finnish port of Petsamo on the 31st of March 1940 and the men of the Artillery Regiment promptly disembarked together with their guns, moving without delay onto trucks which would carry them to Lapua, deep in the heart of Finland. The Regiment would train and then go into action with the rest of the Commonwealth Division, with their actions documented in the Official History.
Two events which did not find their way into the official history were recorded by members of the Regiment and found their way instead into unit folklore: The first took place in the early days of the units participation in the Winter War as they supported the attack that swept down the length of the Karelian Isthmus in spring 1940. A warning had been issued to be particularly wary of Soviet landmines and anything resembling a booby trap. Sure enough, a suspicious looking Red Army helmet was sitting right in the centre of the gun position. Dual leads protruding from its underside were concealed in an adjacent clump of weeds. Everyone gave it a wide berth while plans were made to deal with the problem. Eventually a generous length of signal wire was obtained and laid out with one end looped over the hazard. All hands took cover as the other end was tugged vigorously. The helmet rose sharply, somersaulted several times and came to rest upside down, harmlessly trailing its dual leads-cum-chinstrap.
Later in the war, the unit had a tale to tell that implicated a sizable element of the Composite Field Regiment but it was also a tale that did not find its way into the official histories. The action took place in Viipuri, a Finnish city famous for its old castle. But neither history nor architecture was the focus of a large party of 26th Battery personnel who had exchanged their gun pits and command posts on the Syvari front for a few days of peace and freedom “in the big smoke”. In the main square around noon an uninhibited display of gunner exuberance fuelled by varying degrees of over-indulgence attracted the unwelcomed intervention of the Finnish Military Police. The international incident that followed came to be known unofficially as the “Battle of Viipuri”. An influential witness to the action at Viipuri that day was the commander of the Finnish Armed Forces, Marshal Mannerheim. Later that day, after some compelling arguments in the Viipuri Military Headquarters by the officer in charge of the leave party, all the gunners were released from military custody so that they could finish their few days of leave before returning to their posts at the official and rather more important Syvari Front.
They were not released however, until they had been paid a personal visit by the Marshal, who thanked them for coming to fight for Finland but then rather acidly requested them to refrain from destroying one of the cities they had travelled so far to protect – something which, based on what he had seen, they could undoubtedly achieve. Suitably chastened and also somewhat relieved, the men of 26th Battery completed their leave rather more decorously. A sequel to the day was a message from Finnish Military Headquarters complimenting the personnel of the Composite Field Regiment, and in particular the men of the 26th Battery, on their “fighting zeal” and trusting that in future this would be directed at the Russians. The regiment did indeed play vigorously at times, but it also fought with dogged determination at the forefront of the action in the offensive on the Karelian Isthmus and then in the defence of the Syvari in the great battles of July and August 1940.
British-supplied and New Zealand/Australian Army-volunteer-crewed 25-pounder guns in action at the Crossing of the Syvari, 23rd August 1940
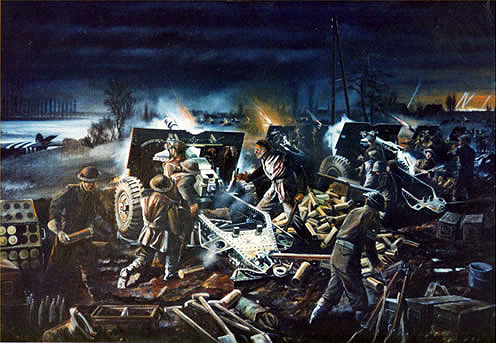
Painting, Left: British-supplied and New Zealand/Australian Army-volunteer-crewed 25-pounder guns in action at the Crossing of the Syvari, 23rd August 1940: In early August 1940, Stalin rejected peace feelers extended yet again by the Finnish Government and launched a massive attack against the Maavoimat along the entire front, from the White Sea to Pietari (Leningrad). The attack was defeated, with the Red Army suffering massive casualties. The Finnish response was a large-scale attack across the Syvari aiming to demonstrate that the Maavoimat could if they wished isolate and capture Leningrad. An airborne assault to secure a firm bridgehead was accompanied by armoured and infantry formations crossing in strength. The attacking force was supported by 500 field, medium and heavy guns. Their covering fire as the assault crossing began must rank as the largest of the war by the Maavoimat. The barrage commenced at 21.50 hours on 23rd August 1940, while the Red Army was also hammered by ongoing attacks by close support aircraft and extensive special forces attacks deep in their rear areas.
The painting shows 25-pounder guns of the New Zealand/Australian Army’s composite (Finland) Field Regiment in action, covering the Syvari crossing by infantry and armour of the 21st Pansaaridivisoona, which led the attack, strongly supported by the Commonwealth Division. Nearby, Red Army positions are being bombed by Ilmavoimat close support aircraft. To the left is a crashed Parajaegerdivisoona glider. In front of the position is the Syvari, lined by trees. The guns and their ammunition limbers are all packed close together. The Gunners’ rifles and a Suomi submachine-gun (no doubt illicitly acquired) are stacked, while empty brass cartridge cases are flung to the side of each gun. In the rear are stacks of ammunition boxes. The scene is one of disorderly confusion, intense activity, deep mud and huge ruts. The Regiment advanced southwards with the leading formations of the Maavoimat during its epic move on Leningrad, followed by its equally rapid withdrawal. The intransigence of Stalin in ignoring the implications of this attack whilst simultaneously rejecting Finnish overtures to a peace agreement aimed at securing the end of the war would result in the two bomber raids by the Ilmavoimat which would stun the world. The first of these raids have a devastating effect on the Soviet economy, while the second would result in the death of both Stalin and a significant portion of the Politburo.
During the advance on Leningrad, the Regiment would acquire an extra two Batteries of artillery pieces that contrasted markedly with its normal complement of 25 pounders. It comprised eight captured Red Army 152 H 09-30 152mm heavy howitzers presented to the regiment by a Jaeger Company of the 21st Pansaaridivisoona which had overrun the Red Army artillery unit to which they had formerly belonged.The guns, their tractors and a large supply of shells were withdrawn back across the Syvari by the Regiment as the Maavoimat withdrew to their starting point, satisfied that the Red Army had been suitably chastised for their temerity. Six weeks later, the Winter War had come to an abrupt end as the triumvirate that had replaced Stalin in leading the USSR negotiated and concluded a peace agreement that saw the Maavoimat returning to what were largely the pre-war borders, with some adjustments. The Composite Field Regiment withdrew together with the rest of the Commonwealth Division and waited as, unit by unit, they were transported to Petsamo and shipped back to the UK.
25-Pdr’s of the New Zealand/Australian Composite (Finland) Field Regiment during an inspection by Marshal Mannerheim sometime between the end of the Winter War and their return to the UK in late 1940. The 25-Pdr guns (and the Red Army “souvenirs”) were left with the Maavoimat when the Regiment departed. They remained in service with the Maavoimat through to the end of WW2, at which point, worn out from heavy usage, they were retired and used as museum pieces or put on display as part of monuments and memorials.
By now, the Field Regiment had been in battle almost continuously for some five months, with much heavy fighting. Under the tutelage of the Maavoimat and in a pressure-cooker environment where failure meant death, if not for them, then for the infantry and armour they were supporting, the Regiment had become as expert as the Maavoimat Artillery Regiments – at this time and through the remainder of WW2, the best Artillery in the world thanks to the expertise and leadership over the decades since independence of the Maavoimat artillery commander, General of the Artillery Vilho Petter Nenonen. With unequalled operational experience, now highly trained in combined arms operations and with skills that the British and Commonwealth armies would not acquire until almost the end of WW2, the last chapter in the saga of the Composite Field Regiment was rather more of a disappointment to the members of what had now become a highly-experienced and tightly-knit unit.
On returning to the UK, the (Composite) Field Regiment and their CO, Lieutenant Colonel “Ike” Parkinson made a concerted attempt to remain intact as a unit and to pass their expertise and skills, which they considered to be vastly superior to the practices then in place in the British and Commonwealth artillery, on to the British and ANZAC Artillery. The attempt failed, the men were split up and returned to the various Field Regiments of their respective armies where replacements were needed and an unrivalled pool of expertise and hard-earned practical knowledge was lost for good. It would take the British and Commonwealth Artillery years of combat and many casualties to relearn the hard way the lessons that the (Composite) Field Regiment could have so easily passed on. In the eyes of the disgruntled gunners, it was a case of the “not invented here” syndrome at its worst.
Lieutenant Colonel “Ike” Parkinson returned to the Middle East where he resumed command of 4 Field Regiment of the New Zealand Army. Under his command in North Africa, few other artillery regiments equaled its operational expertise. The special status the regiment enjoyed within the Divisional Artillery often attracted tasks of particular difficulty or importance and by the time the slow hard slog up the Italian peninsula through two bitter winters and across much formidable terrain to final victory at Trieste had been completed, the Regiment was recognized as the best in the New Zealand Army. Thus it was that at the end of the war in the Pacific, the Regiment’s 25th Battery was chosen for the “J” Force component of the army of occupation in Japan. In Japan, the battery would once more find itself alongside Maavoimat artillery units, part of the small Finnish “Task Force Hirose Chusa” that had been dispatched as the Finnish contribution to the Army of Occupation in Japan.
And one last contribution from New Zealand – Railway and Forestry Companies
After the New Zealand Government had indicated the intention of New Zealand to assist Finland through the dispatch of Volunteers, and indeed after the Volunteers were on their way, the Finnish Government, via the New Zealand High Commission in London, would make one further request for assistance.
The Ambassador of Finland in London to the New Zealand High Commissioner, London, dated 19 January 1940 – A very pressing need has arisen for the immediate provision of assistance with Transportation and Forestry work in support of the Finnish Army. Should it be possible, the Government of Finland would request assistance in the form of:
One Railway Survey company and Four Railway Construction companies to assist with the continuing construction of the Railway Line from Tornio to Lyngenfjiord in northern Norway. This is a critical rail link for the importation of military supplies and as many of the railway construction workers are now in the Army, it would be of the greatest assistance if the New Zealand Government could provide skilled Railway surveyors and construction workers. No military experience is considered necessary.
Four Forestry companies to assist with the cutting and milling of timber for use in constructing defences and in general support of the Army. While Finland has no fixed war establishment for a Forestry company, it is understood that the 1918 war establishment of a Canadian forestry Company consisted of six officers and 173 other ranks (including 20 log-makers, 30 rollers and chain men, 10 road-cutters, and other specialists such as sawfilers, millwrights, log-setters, &c., and 40 general hands) and 69 draught horses. Again, with most of our men of military age in the Army and fighting on the frontlines, sizable units of this nature can only be raised in Finland with great difficulty and in small numbers, and the suggestion has been made that His Majesty’s Government in New Zealand might be prepared to assist in the provision of these units. The New Zealand Government’s early observations on this suggestion would be received gratefully by the Government of Finland.
The Governer-General of New Zealand via the New Zealand High Commissioner, London to the Government of Finland, dated 22 January 1940 – Your telegram of 19 November. Approval has been given by His Majesty’s Government in New Zealand to the provision of the following units for service in Finland in a non-combatant role:
One Railway Survey company, Royal New Zealand Army Engineers
One Railway Construction company, Royal New Zealand Army Engineers
Two Railway Operating companies, Royal New Zealand Army Engineers
Six Forestry companies, Royal New Zealand Army Engineers
The Government of New Zealand has consulted with the Government of Australia on this matter and the Government of Australia has agreed to provide the following units for service in Finland in a non-combatant role:
Four Railway Construction companies, Royal Australian Army Engineers
The proposal is to recruit the personnel for these units by the end of January and it is expected that they will be ready to leave New Zealand and Australia about the middle of February. On the arrival of these units in Finland it will be necessary for the Government of Finland to arrange the provision of the necessary equipment for them.
Regarding financial arrangements, as the units are being provided at the specific request of the Government of Finland it is suggested that the arrangements should be as follows:
(a) That the New Zealand and Australian Governments bear the cost of pay, pensions, dependants’ and field allowances.
(b) That the Government of Finland bear the cost of officers’ mess allowances and all provisions, including accommodation in Finland, the cost of transport to Finland and back to either the UK or New Zealand or Australia at the end of the war and all other expenses connected with the equipment, work, or maintenance of the units.
The Ambassador of Finland in London to the New Zealand High Commissioner, London, dated 24 January 1940 – Your telegram of 22 January 1940. The New Zealand and Australian Government’s offer to provide the units mentioned is accepted with gratitude by the Government of Finland. The question of their transport to this country has been reviewed and a Finnish Cargo/Passenger Ship currently in the Pacific is being dispatched to Auckland forthwith.
The New Zealand High Commissioner, London to the Ambassador of Finland in London, dated 2r January 1940 – I have been asked by the Prime Minister to inform you that steps have already been taken with a view to recruiting the men and transporting them as soon as possible. The Prime Minister asks me to say that if there is any other form of help which the Government of Finland wants, and which New Zealand is able to give, you have only to ask for it.
The New Zealand Government’s immediate response was to place advertisements in newspapers calling for men with logging, sawmilling and railways surveying and construction experience. More than 6,000 replied, three times the number required. The New Zealand Forest Service was given the task of selecting men for the Forestry companies whilst the New Zealand Railways selected men for the Railways companies – and many of the volunteers were Railways employees. Within the Forestry Service the job of picking out the most suitable personnel was delegated to forester A.P Thomson. Criteria were laid down, with detailed numbers by trades and occupations required (key workers like benchmen, tailers-out, sawdoctors etc); there needed to be wide geographical representation from over New Zealand; the home sawmilling industry was not to be unduly dislocated; and all had to be physically grade 1, single and under 35 years of age. There were still many suitable men left after the occupational and other requirements had been met. The physical requirements were simple: over six feet in height and in sound health.
No wonder there was a very high average height among the 1,165 forestry men who went into camp at Papakura on 13 February, 1940. They received a cursory two weeks of basic military training, largely in drill, before embarking on a Finnish cargo/passenger ship for an unescorted voyage across the Pacific to Vancouver, from where they were to be entrained to Halifax, after which they would be shipped to Finland in an escorted convoy. They arrived in Finland at the end of April 1940 along with the men from the New Zealand and Australian Railway and Construction companies. The New Zealand Forestry contingent was commanded by Major K. O. Tunnicliffe, while Captain J. G. Elliot, Captain J. D. Coogan (of Whakatane), Captain C. Biggs (later Forest Service Conservator of Forests Nelson), Lieutenant A.P. Thomson (a future Director-General of Forests), Captain O. Jones and Captain D.V.Thomas were the Forestry Company commanders. Other officers included Lieutenant H.E. Otley (who was associated with a well-known Christchurch timber firm) and Lieutenant A.L. Poole (who would also later become Director-General of Forests). The experiences of these men, many of whom would go on to senior positions in the New Zealand Forest Service, would be instrumental in the close ties between the New Zealand and Finnish forestry industries in the post-WW2 decades.
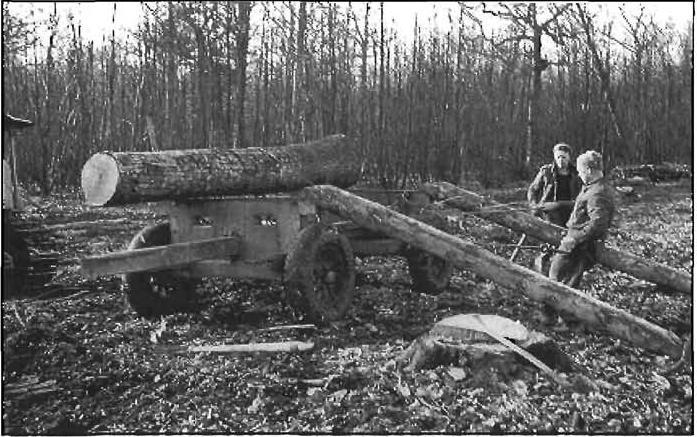
On arrival, the Forestry Companies were moved up to Eastern Karelia and put to work cutting and milling timber for use in the construction of fortifications along the Finnish frontlines. With a frontline that by early June 1940 stretched from the White Sea to the Gulf of Finland, the demand for timber for the construction of bunkers, trenches and fortified positions as well as for corduroy roads in general was enormous – and with most of the Finnish forestry workforce in the Maavoimat, there was a distinct shortage of forestry workers to cut and mill timber. The six New Zealand Forestry Companies made a substantial contribution with their industrial-scale New Zealand type mills.
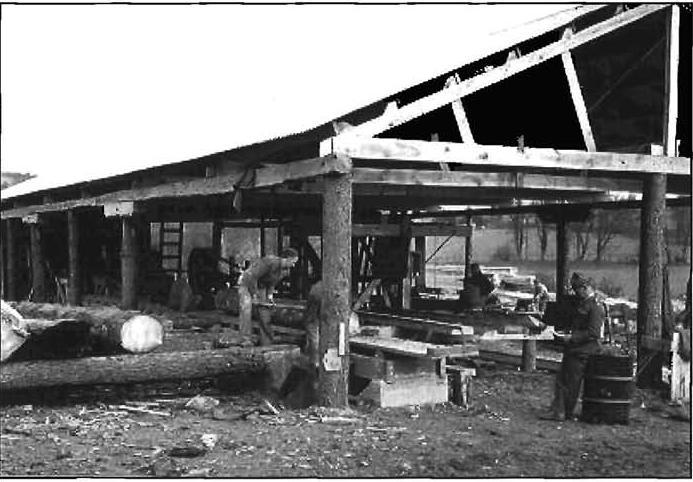
New Zealand-built sawmill near the White Sea
The New Zealands disparaged the Finnish methods they had encountered which were largely manual: breakdown benches requiring logs to be wound through by hand; no power on the feed or return rollers of the breast benches; no pin fences to size boards sawn; no trolleys to carry flitches from the breast benches or sawn timber to the skids; no water to cool the saws; and sawdust had to be shovelled away from the saws by hand. In contrast the New Zealand type mills built had power feeds for the breaking down benches with water-cooled saws, powered return-feed breast benches, pin fences to size the boards, powered goose saws and sawdust conveyors.
New Zealand foresters logging Finnish beech, Eastern Karelia
The Finnish Forestry Service found it easy to understand the New Zealanders’ insistence on access to water, although one exasperated New Zealand officer was reported as having to convince a skeptical Finnish officer with no forestry experience by saying, “Now look here mate, if you turn 48 inch diameter circular saws at a thousand r.p.m, spindle speed and feed them at two and a half to three inches per revolution and butt one flitch after another so that you are cutting timber all day instead of cutting wind, you are going to have bloody hot saws which will fly to bits unless you run a film of water on the surfaces all the cutting day.”
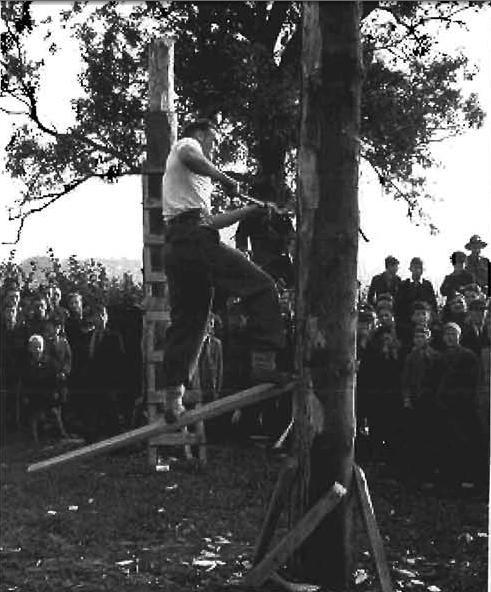
Logging competition – New Zealand forester entertaining the Finns
The output of the New Zealanders was claimed to be consistently higher than that of forestry groups from Canada and Sweden. Comparative figures for the 13 weeks for July to September 1940 showed that the average weekly output of the New Zealanders was 951 cubic metres versus 899 for the Canadians and 783 for the Swedes. The norm for each New Zealand mill from an 8 hour shift was 35 cubic metres. One New Zealand mill produced 46 cubic metres in 7 hours 20 minutes cutting time with a crew of six men. The New Zealanders got on well with the Finnish people and, on the whole, were magnificent ambassadors for their country. They even responded to the interests of the Finns by competing with them in chopping and sawing contests, the results of which ran about 50/50.
The roles of the New Zealanders in Finland varied a great deal. In addition to logging and milling themselves, they frequently assumed an administrative function, arranging for supplies of timber to be transported to the military fronts where they were most urgently needed. On occasions they stepped in to supervise the Karelian forest and mill workers who the Finns employed for logging operations – one large Karelian mill captured intact from the Soviets employed 500 workers, most of them Karelians who were willing to work for the Finns once the fighting had passed them by. In the forests themselves, they faced a range of problems, not the least of which was the danger from Finnish soldiers on leave shooting deer in the Forest.
After the Winter War ended, the Forestry Companies would move to the UK, where they would perform a similar role, as would the Railway Construction and Operating Companies who had spent most of their time in Finland working on the strategically important double-tracking of the Lyngenfjord line.
The Australian Volunteers – after the Winter War….
After returning from Finland to the UK in late 1940, surviving members of the Australian Volunteers were largely sent to the Middle East to join the Australian formations there as replacements. In this way, and in common with the British, Canadians and New Zealanders who had served as volunteers in the Winter War, an unrivalled pool of military expertise gained at a high prices in lives and courage was dissipated with no institutional lessons learned or passing on of the valuable knowledge and skills acquired. Unlike the Maavoimat, which had long institutionalised the capturing, evaluating and disseminating of lessons learned, the Commonwealth Armies continued to suffer from a bad case of “not developed here-itis”, and indeed, many of the volunteers found themselves behind in the promotional stakes and serving under far less competent and battle-experienced commanders than should have been the case. Their intense combat-experience in Finland was discounted, and indeed, was even looked at as a negative in many cases.
References: Aside from the fictional volunteers, the information on Australian aid to Finland in the Winter War is very loosely based on an article by an Australian historian A R G (Tony) Griffiths entitled, strangely enough, “Australian aid to Finland and the winter war” which can be found in “The Journal of Baltic Studies” Volume 9, Issue 1, 1978. The extent of Australian aid has been somewhat (!) magnified for this alternative history. Needless to say, in reality there were no Australians of the Commonwealth Division in the Winter War.
 Copyright secured by Digiprove © 2013 Alternative Finland
